
I am no longer supporting this website; therefore, all content is at your own risk.
Augold's Place
Oklahoma E-mail me
TS4 Tutorial: How to Create a Custom Painting Using Gimp 2.8
Materials Needed:
Sims 4 Studio (S4S)
(If you do not already have the software, you will need to register at the Sims 4 Studio website. You can get there by clicking the S4S logo on this page. Instructions on downloading and installing the software are available there as well.)
GIMP 2.8
(If you do not already have the software, you will need to download it and install it from the GIMP website. You may get there by clicking the GIMP 2.8 button on this page. Instructions on downloading and installing the software are available there as well.)
**If you do not know how to use the software, you can still follow my tutorial. Please NOTE, I am not going to teach you the ins-and-outs of each software used. That would take to long, and this is just not what this tutorial needs to cover. **
Most tutorials will have you start with S4S or even GIMP - Photoshop, TSR, but I am going to get you started on images.
Choosing a good image is key when creating a custom painting and patterns for that matter. When searching Google, enter what you want as your "New" painting. For example, Victorian paintings. Click Images and a slew of Victorian paintings will appear. When you hover over an image, there is information at the bottom which is very important to creating patterns, custom paintings, and even the occasional mural. What appears is the size of the image.

This is very important because you want the size to be just slightly bigger than the painting you are importing into the EA frame. (We will go over how to figure the size of the image in a bit. All EA paintings are different sizes.) It is better to scale an image down then to scale the image up. When scaling up, if the image is not a vector image, the picture becomes more pixelated-blurry. We don't want the image to be blurry because then fixing it will take hours to get it right. If you can find something that is already vectored, then use that image. So, scaling down the picture doesn't lose the quality and become distorted.
To save the image it is better to right click the image and select "Open Image in New Tab".
You are able to see the quality of the photo better. If the image is of good quality, then, right click the image again and select "Save Image As". (If the image is not good, look for a different one.) Save the image in a place you can remember. Some people save to their Photos folder, and others will save to their Desktop. After a while, your Desktop will get to full and the computer will become too laggy.
This is the image I have chosen. (It was two images to the right of the photo with the image size showing.)

Now, let's start doing the fun stuff!
(If you already know GIMP, then skip to Part 2 - S4S)
Part I - GIMP
1. Open GIMP. Go to File>Open>Select the image wherever you saved it>Open
(I will go over how I manage my images and Custom Content in a different tutorial.)

This is the pop-up window.

Keep GIMP open!
Now we need to find out what size to make the image. We have to retrieve the information by going into Sims 4 Studio (S4S). There we will select the painting, export the frame and the painting--it looks weird, but hey, EA just couldn't make it look perfect--then we will go back to GIMP for some touch-ups, and come back to S4S for the finale.
Part 2 - S4S
Step 1.
Start up S4S. Click Standalone Recolor> Then Object

Step 2
New window appears with all kinds of EA goodies. But we want a good painting for our image. Mine is a portrait; therefore, I am going to select a portrait painting. So, in the search bar, I am going to type in "pai". I know, that's crazy, right? But it works and all the paintings show up. Search Box> Enter Pai> Select the painting you want> Click Next

This next window, for the first time I used it, confused me. I wasn't used to saving something I had not completed yet. But it is understandable. S4S does this now because you are going to be creating your .package file. Why do it in the end? Therefore, by saving now, you are creating the .package and everything you save in S4S will be in this little file all packaged up.

A lot of people save their files all kinds of ways. You save your files they way you want to, but
you download content just like anyone else. All creators download other creators content. This is a known fact. There are so many files I have downloaded and deleted because I did not know who those files belonged to. I ended up having to change the way I download content and organizing my files. I wish we could all have one set standard, but we can't make people follow a standard. (Don't ask me why. I have been asking myself that for a long time.)
This is my rule of thumb:
Creatorname (or initials)_NameofObject_Wheretofindit
Now that isn't so hard to do or to remember! So easy! Alright, we are moving on. We still have a bit to do.
What happens after you save? Will this window comes up: (This one down there.)

The two default tab settings are: Studio and Catalog
Studio is where you make most of the Minor changes to an object.
Catalog is where you change the information connected to the object that will show up in the catalog within the game. You do not have to make the Catalog changes now, but you should now or right before you are ready to click on your final Save.
When you have made the necessary changes, or not, click on the Texture Tab.
Wow! What is this stuff?
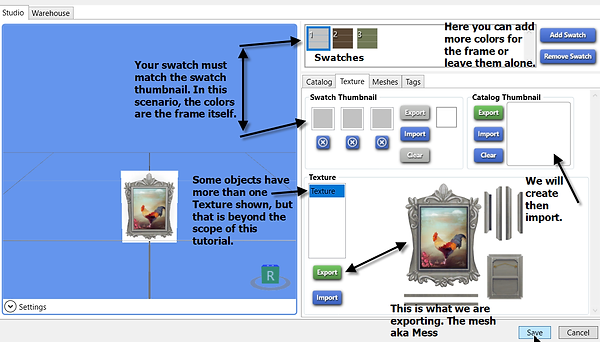
Well, THIS is the heart of your work for custom paintings. Here you will find the swatches--in this case the color(s) for the frame, the actual mesh texture, thumbnail colors, and the thumbnail. S4S can create a thumbnail for you, but I would rather do my own.
Step 3
Do you want to keep the EA swatches, or not? In this case, I do. This is important. For every swatch you have, you can change the image. So, in this case we could have three different frame colors for one image, or three different frame colors with a different image in each frame.
You can add more swatches, which will allow the downloader to have a different variety of frame colors. You can have like 8 swatches with the frame the same color per swatch, but a different image in each frame. Confusing, huh? Yeah! I thought so too, but it is cool to test it out. This allows you to create a specific set for your photos. Ok on with the show.
Step 4
Swatch thumbnail- shows the colors specific to the current swatch that is selected. When a player hovers over the image, the colors that are available to the object show up. That is where this comes from.
It is very imperative to make sure that your swatch colors and swatches are the same color. Even though when you make a change to the colors, the swatch colors will change as well, you still need to make sure that they are.
Step 5
The Catalog Thumbnail--S4S can create a thumbnail for you. I am going to create my own and show you how easy it is. When a player opens the catalog, it is this image they will see. Want to make sure they know what they are selecting; so, we need to make sure we make our thumbnail correctly.
Step 6
The Texture!--Yeah! (whispers-I think)
In my selection, I have one texture present (whew, thank goodness). Some objects have more, but that's for a different tutorial. The image shown on the right of it is the mesh, or what I call a mess. (hehe) You can see where we have to put the image. For some paintings, the image may be flipped, or landscape with the head of the person facing left or right, or the image is portrait, but the head is flipped and downward. You have to make sure the new image is exactly situated like the one the mesh.
(Ex. You chose a portrait and the mesh has the image landscape and the head facing right.
Your image has be in landscape and the head (or top) has be facing right.)
Step 7
No we are not SAVING yet! You are getting to anxious.
Nope we are going to click export. The one next to the mesh. (Don't touch the export button next to the thumbnail! I wonder how many of you will do that anyway.)
Ok here are the steps simplified. Texture> Export> Give the Texture a name> Save
here I suggest you putting this mesh in the same location as your picture. Name the same as your picture, but instead of putting where it can be found, put in mesh.
Mine is going to say: qe1_custompainting-tut_mesh (Here is another picture.)

S4S we close that save as window and leave you where you were when you clicked export.
Go to GIMP. Time to make adjustments to the image. (Remember where you saved this file!)
Leave S4S open!
Part 3 - GIMP
Now we need to import our mesh into GIMP. (Are you scared? Don't be!) Here is a picture.

After you click Open, the Load DDS box comes up. Leave the checks alone. Just click OK

Here is the step made easy:
File> Open> Select your file> Click> Open> Pop-up> Click OK
Now we need to get measurements for the image. Here's a pic:
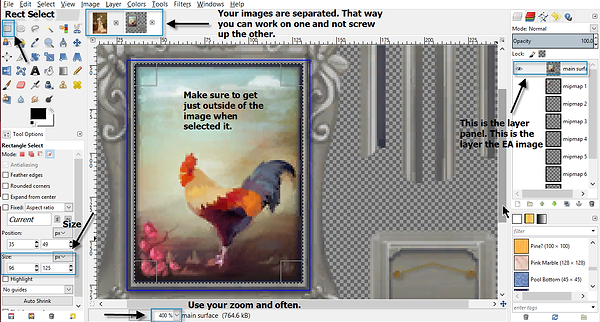
When you opened the EA painting, GIMP automatically put the image into a new window. So now, your images are separated and have their own windows. This is very helpful. You will find out in a moment.
Also, you will notice that on the right-hand side of the screen is a panel. (Actually two panels) The top panel is your Layers panel. The bottom one is the patterns.
When you imported your mesh, GIMP automatically separated its parts into layers. Your top layer is the image layer. We are in this layer, and we will only be messing with this layer. Later, we will incorporate the "new" image, and that too will have its own layer. Then, we will merge everything.
Step 8
Click your zoom button and zoom in to about 200 or 400%. It is located at the bottom of the screen. You need to see exactly where you are to select the image. You might have to zoom in and move your sliders, but hey that's easy.
Step 9
Click on the Rectangle Select. It is in the Tools Panel on the left-hand side of the screen.
Step 10
Now, select the image. Get just one pixel or two from the outside of the image. This way, if there is a bit of overhang from the "new" image, it will be hidden.
Step 11
After selecting the image, Check the size. Yours may be different from mine. But hey, now you know the size of the coq photo, right? If you are like me and are very forgetful, please, please, please write down the number of the size of the photo. You do need it.
Step 12
Go to the top of the screen. Click the Select menu. Then select None. The selection of the image disappears.
OK here is the simplified version of what we did.
Zoom> Make necessary adjustment> Rectangle select> Select the image> Check the size of the image> Select> None
Step 13
Now we go to the "New" image. Select the "new" image by going to the little window showing the photo above your workspace. Then, click on Image menu and select Scale Image. Click the chain, enter the numbers, click Scale.
Here are some photos:


Make sure to click the chain next to where you enter the numbers. The chain has to be broken just like it is in the image. If it is not, the scaling will be wrong.
Step 14
Now, we need to select the image , select Copy and then Paste it into the other window. (It's late and I'm getting tired. O.o) Yeah! Isn't that cool? We can switch and drop and drag and cut and paste. Kindergarten all over again kids!

Step 15
We need to click on the mesh image; then, right click on the EA image and select paste.

Step 16
This is the tricky part. Now, now...hold on there folks It's not that much of a headache. At least for the tutorial I chose an easy one, right? We aren't having to make the photo do splits, somersaults, and cartwheels.
We have to get the "new" image over the EA image. Make sure you select the rectangle select tool. Whatever tool you last used, in whichever window, it is still "ON". Clicking the rectangle select tool will insure there are no complications.
Here is a pic:

Step 17
Now we need to make sure the image stays in place and doesn't fly out of the frame when we carry it back to S4S. So, what do we do? Well, we have to anchor it. When we pasted the image into the mesh window, GIMP automatically made a customized floating layer for us. Once we position the photo where it needs to be, just like a ship anchoring in the ocean or at the marina, we too have to anchor our image. But where is that?
Here is pic for you.

Your cursor will be an anchor.
So, here we have the right-hand side of our screen. At the top, is our floater. Below that is the main image (EA's image that is). Then, at the bottom of the panel is the anchor tool. Click the anchor tool. Now the image will stay put.
Step 18
Go back to the new image window. It is time to create our thumbnail. Just like before when we scaled it, we are going to scale it again.
Image> Scale image> Break the chain> Enter 32 for the width and 32 for the height. S4S accepts that size for thumbnails.
Now after doing this. You want to export the thumbnail.

A pop-up window will appear. Make sure you put your thumbnail where your other files are for this project.
**TIP: I did my filename incorrectly, but this is a tutorial, and I will be deleting it.
For my thumbnails, I use this method on saving :
qe1_.packagefilename_thumbnail.png
Always, Always use the .png. PLEASE!**

Now we need to save our mesh. Here is a pic to explain. Similar to above, but different in a small way.
File> Export As> Keep filename and make sure it is .dds> Make sure it is saving in the correct place> Export


A pop-up window occurs

Click replace.
All that you are doing is replacing EA's image with YOUR image.

Another pop-up window, leave compression alone. Leave format alone. On mipmaps, click generate mipmaps. Then , click OK.
Once you have done that, you are finished with GIMP.
To close out:
Click the x by the image at the top of the workspace. You will be asked if you want to save changes, you can cancel, or discard changes. I always discard the changes. Do the same for the other image. (You are basically closing their windows.)Why? I want the originals as they were. If I am working on making a pattern seamless, when it was originally non-seamless, then I save the changes. I don't want the non-seamless file again.
Part 4 - S4S
Step 19
We are almost finished folks! (What a long night!)
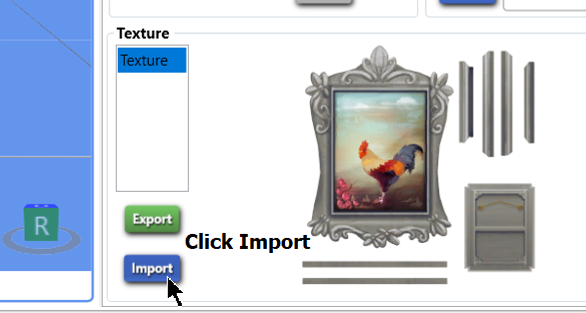
Go to S4S. Click Import> Click the .dds file (the mesh)> Click Open

Your new image will load with the mesh. In the viewer, you need to look and see if there are any gaps or you just flat out put the image in the wrong spot. This is the time to make the necessary changes. You will have to go back into GIMP. (After doing a few of these, I usually don't need to. So, for the first two or three times of making custom paintings keep GIMP open and don't close your image and mesh windows.)
Now we need our thumbnail.
Click Import> Select your thumbnail file> Open
Your thumbnail will appear in the thumbnail window. I didn't take a pic because I didn't create my thumbnail. (Like I said, I am not using the image.)


Now you can save your project! Woot Woot! We did it! You can do the noodle dance now!
BUT you need to check it in game and make sure everything is working okie-dokie.
I hope you enjoyed the tutorial. If so, just leave a comment at the end of the page.
Thank you! Remember...just keep simming!!!!
STEP 20 ----Leave a comment!